Showing posts with label linux. Show all posts

Sunday, 27 October 2013

How To Scan a Website for Vulnerabilities In ( Backtrack / Kali Linux )

Hello guys, today I'm going to show you how to scan for vulnerabilities in a website, or all the websites in the server. In this tutorial I will use a program in BackTrack called UniScan. it's very easy to use, but very good in scanning. First of all, open your terminal and type this command: 

cd /pentest/web/uniscan && ./uniscan.pl


Something like this will be printed on your terminal. Now all we have to do is follow the instructions. First of all we need a target to scan, I've chose one already and I will use it in my pictures. To start the scan, first you have to check the options which you want to use in your scan.
 # HOW TO USE OPTIONS: Check the letter beside your option, and include it after the URL like this:

 ./uniscan.pl -u http://www.website.com/ -b -q -d -w

or put them all together.

 ./uniscan.pl -u http://www.website.com/ -bqdw 

This will start your scan with all the different options you included.
  NOTE:- NEVER FORGET THE FORWARD SLASH AT THE END OF THE LINK IN THE COMMAND!! Now the scan will start, and the terminal will look something like this:


This scan will scan for vulnerabilities like SQL-i / LFI / RFI and so on. It also searches for Webshells, backdoors, PHP info disclosure, Emails, and much more. Here are some examples: PHP.info() disclosure:


External Links/Hosts:


Source Code disclosure:


Dynamic Scan, Vulnerability Identification:


This program can also get all the sites in a server, and then you will be able to scan all of them. To do that, run this command:

 ./uniscan.pl -i "ip:127.0.0.1"

 Change 127.0.0.1 to your target server. All the websites will be stored in "sites.txt" in the same directory. Now to scan those sites in the list, run this command:

 ./uniscan.pl -f sites.txt -bqwd 

You can change the options to whatever you want.

I Hope You Enjoyed  , thanks to Zamil for this Great Tutorial  ...!!!
If You Have any Question or Problem Comment Below

Social Engineering Toolkit ( Backtrack / Kali Linux )

The Social-Engineer Toolkit (SET) is specifically designed to perform advanced attacks against the human element. Originally this tool was designed to be released with the http://www.social-engineer.org launch and has quickly become a standard tool in a penetration tester’s arsenal. SET was written by David Kennedy (ReL1K) and with a lot of help from the community in incorporating attacks never before seen in an exploitation toolset. The attacks built into the toolkit are designed to be targeted a focused attacks against a person or organization used during a penetration test.
 
Features of SET
 
  1. Spear Phishing Attack vector
  2. Website Attack Vector
  3. Infectious media generator
  4. Create a Payload and Listener
  5. Mass Mail Attack
  6. Teensy USB HID Attack vector
  7. SMS Spoofing Attack Vector
  8. Wireless Access Point Attack Point
  9. Third Party Modules

How to Use Social Engineering Toolkit in Backtrack 5


Open your backtrack  console & Type cd /pentest/exploits/set


Now type ./set 


Spear-Phishing Attack Vector: The spear-phishing attack menu is used for performing targeted email attacks against a victim. You can send multiple emails based on what your harvested or you can send it to individuals. You can also utilize fileformat (for example a PDF bug) and send the malicious attack to the victim in order to hopefully compromise the system.

Website Attack vector: The web attack vector is used by performing phishing attacks against the victim in hopes they click the link. There is a wide-variety of attacks that can occur once they click. We will dive into each one of the attacks later on.
 
Infectious Media Generator: The infectious USB/DVD creator will develop a Metasploit based payload for you and craft an autorun.inf file that once burned or placed on a USB will trigger an autorun feature and hopefully compromise the system. This attack vector is relatively simple in nature and relies on deploying the devices to the physical system.
 
Create a payload and Listner: The create payload and listener is an extremely simple wrapper around Metasploit to create a payload, export the exe for you and generate a listener. You would need to transfer the exe onto the victim machine and execute it in order for it to properly work.
Mass mailer Attack: The mass mailer attack will allow you to send multiple emails to victims and customize the messages. This option does not allow you to create payloads, so it is generally used to perform a mass phishing attack.
 
Teensy USB HID Attack vector: The teensy USB HID attack is a method used by purchasing a hardware based device from prjc.com and programming it in a manner that makes the small USB microcontroller to look and feel exactly like a keyboard.
 
SMS Spoofing Attack Vector: This module allows you to specially craft SMS messages and send them to a person. You can spoof the SMS source.
 
Wireless Access Point Attack Vector: it Can be used to set up a rouge wireless access point, Spoof DNS and redirect all traffic to attacker.
 
Third Party Modules: This attack vector consists of Third party module – RATTE (Remote Administration Tool Tommy Edition) which is a HTTP tunneling payload. This can be used in the same way as website attack vectors but with an added advantage of beating security mechanisms like local Firewall and IPS.

We Hope That You Learned Something Very Useful From This Tutorial...!!!

If You Have any Question or Problem Simply Just Comment Below

Saturday, 26 October 2013

Install Linux On USB Key Using Virtual Machine | Tutorial

In this tuorial i will explain you how to Install whole Linux distro on USB key step by step using virtualbox alternatively you can use any virtualization software , i’ll using ubuntu as linux distro in this guide ..
Linux ISO : Download Ubuntu
requirements : 8 GB USB drive ( 16 recommended )
Virtualbox : download virtualbox
virtualbox extensions :

setup :
  •  format usb drive 
  • connect usb drive to vm when installing 
Steps :
  1. open virtualbox 
  2. create new virtual machine ‘
  3. choose OS type is Linux and give it a name 
  4. click on setting and click USB from left sidebar 
  5. attach your usb 
  6. now start your virtual machine and choose install Ubuntu 
  7. click on clean install and choose USB drive !important 
  8. wait until it finish installing 
  9. after installation test your Installation using mobalive USB 
  10. now your full featured Ubuntu desktop is installed on USB and ready to use 
  11. enjoy and don’t forget to like us

How To Install Vmware Tool In Backtrack 5 R3 Step By Step [ How To ]

STAGE 3
This is second part of  << backtrack virtual machine installation tutorial 
in this tutorial i will cover how to install vmware tools and additionally how to install
Reboot and login with default username and password

username : root
password : toor

Before installing vmware tools

ONLY KDE users ,  fix unable to create symlink problem :
root@bt:~# mkdir /etc/cups/ppd
Prepare Kernels  Source 
 root@bt:~#prepare-kernel-sources
Change Root password of backtrack 5 R3 installation 
root@bt:~#passwd root 
Enter New UNIX Password : 
Retype New UNIX Password : 
passwd : Password Updated Successfully


After Prepare kernel sources now , Install vmware tools
1 : Eject and Disconnect Backtrack if its still mounted
2 : click on vm and choose install vmware tools
3 : if  mount automatically then its okay else mount manually

 
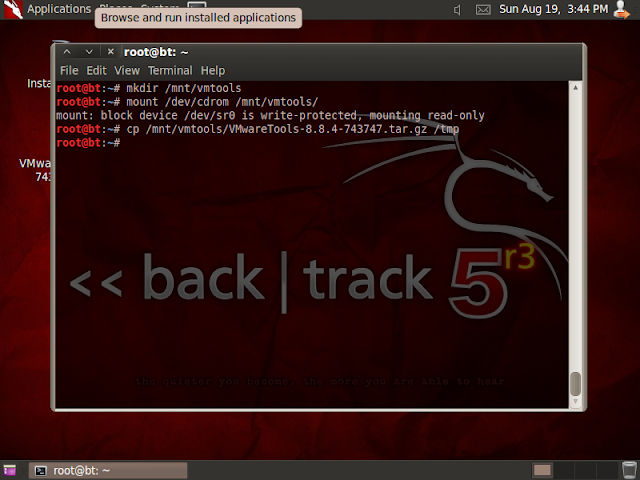
root@bt:~#mkdir /mnt/vmtools
root@bt:~#mount /dev/cdrom /mnt/vmtools/
mount : block device /dev/sr0 is write-protected, mounting read-only
root@bt:~#cp /mnt/vmtools/VMwareTools-8.8.4-743747tar.gz /tmp
root@bt:~#cd /tmp
root@bt:/tmp#tar zxpf VMwareTools-8.8.4-743747tar.gz
root@bt:/tmp#cd vmware-tools-distrib/
root@bt:/vmware-tools-distrib/#perl ./vmware-install.pl


it will ask many question if you are not sure just go with defaults and when it finish installing simply type
fix-splash


root@bt:fix-splash
root@bt:reboot


it will ask many question if you are not sure just go with defaults and when it finish installing simply type
fix-splash


root@bt:fix-splash root@bt:reboot

Installing Backtrack 5 R3 In Virtual Machine Step By Step [ How To ]

In this tutorial i will show you how to install Backtrack 5 R3 which is recently  released by offensive security team . if you’ve previously installed backtrack then you might be familiar with backtrack installations  . its easy and simple just follow given simple steps.


Stage 1 
Requirements
1 : Download backtrack ISO from here
2 :  Download VMware Workstation or  VMplayer
3 : Install any of above

Stage 2

Installation

1 : Create A new virtual machine
Installing backtrack 5 R3 in virtual machine step by step  [ how to ]
2 : choose installer ISO ( choose backtrack 5 ISO ) Installing backtrack 5 R3 in virtual machine step by step  [ how to ]
3 : choose Linux as your guest operating system type and Ubuntu as version
Installing backtrack 5 R3
4 : give a name and location of your backtrack VM
Installing backtrack 5 R3
5 : Specify virtual hard drive space ( 20 GB is good enough )
Installing backtrack 5 R3
then click finish from ready to create vm window
Installing backtrack 5 R3
hit enter to go boot screen then choose default boot text mode and hit enter
Installing backtrack 5 R3
HIT ENTER AT THIS POINT
Installing backtrack 5 R3
type startx to start GUI ( x server )
click on Install backtrack icon or open terminal type sh -c “ubiquity” 
Installing backtrack 5 R3
and continue like normal installation choose keyboard type and provide location info
if you are installing just backtrack then go normally and erase and use entire disk
or if you installing backtrack with other OS then specify partition accordingly ( in this tutorial m using virtual hard-drive )
Installing backtrack 5 R3
click on forward and click on install
Installing backtrack 5 R3
wait until it finish installing
it will take up-to 30 minutes depend on your system
Installing backtrack 5 R3
Stage 3
Network Configuration
virtualbox guest audition installation
vmware tools installation
backup and recovery
snapshots


All this covered in next tutorial >>>>

Monday, 17 June 2013

Introduction to hacking


Many of us are wondering what is hacking , some say its legal others say its illegal as a newbie it confuse a lot so don't worry here's the introduction to hacking . In this am going to tell what is hacking is it legal or not ?  and how to perform hacking with step-by-step tutorials .


So lets start , hacking is of TWO types
1)  LEGAL     - also called as "White hackers , ethical hackers ,.etc

        #  using patch for software products, recovering your personal details if lost , recovering your social network username and passwords, etc


2) ILLEGAL  - also called as "Black hackers , crackers ,.etc "( Imprisoned if caught )

        # hacking sites , gaining information without user's knowledge , spreading virus , keyloggers , etc

In this Blog am gonna post both the above methods (i.e) legal and illegal..
These are only for educational purposes if these are used for any illegal activity or your system gets damaged after following the methods here both the ADMIN and the BLOG is not responsible for your activity ." Learn and try it in your OWN RISK ".

So now you are somewhat clear what the term Hacking is , so I will be posting new methods about hacking , How-to-do step and if you found any problem in performing these methods feel free to post your question in the comment box il reply as soon as possible ..

What are the things that we can gain from this blog ??

1) Step-by -step tutorial for hacking methods
2) Links to softwares related to the hacking methods
3) Additional links to Youtube for easy understanding
4) Any doubts and problems in performing the methods can be posted in comments
      and your questions will be answered as soon as possible
5) Enter your mail-id in Follow by Email to receive the latest hacking tutorials
6) New tutorials are posted every Sunday

Il be soon posting the hacking tutorials in this blog  why do you keep waiting enter your mail id to follow my blog and keep visiting for new tutorials ..


Subscribe to our Newsletter

Contact our Support

Email : ajai199@gmail.com